최근 Node.js Express를 이용한 간단한 웹을 만들어보고 잠시 Node.js를 본격적으로 Routes를 하기전 SpringBoot를 조금 공부하고 가려고 한다.
현재 공부하는 순서는 HTML/CSS 이후 JS 그리고 Node.js를 밟고 있고 별도로 Java/SpringBoot 그리고 Kotlin 다음 Dart를 생각하고 있는데 사실 한개의 언어를 깊게 하는게 중요할 것 같다.
아직은 주니어라고 말하기도 어려운 실력이다보니 여러가지를 경험하는 것에 목적을 두고있다.
서론은 여기까지이고 본격적으로 SpringBoot 프로젝트를 만드는 방법을 살펴보자.
1. Spring Starter Project 생성

2. Gradle - Groovy 선택

3. 의존성추가

4. application.properties 추가
server.port=4040
spring.devtools.restart.enabled=true

spring.thymeleaf.prefix=classpath:templates/
spring.thymeleaf.suffix=.html
spring.thymeleaf.check-template-location=true
spring.thymeleaf.cache=false
server.port : 실행할 포트
spring.devtools.restart.enabled : 파일 수정시 서버 자동실행 여부
spring.thymeleaf.prefix : thymeleaf 경로 설정
spring.thymeleaf.suffix : thymeleaf 어떤 확장자로 종료되는지
spring.thymeleaf.check-template-location : templates에 파일 존재 여부
spring.thymeleaf.cache : 캐시사용 여부
여러 서버를 사용하는 경우 포트가 중복되는 상황이 발생한다. 그런 경우 server.port를 통해 원하는 포트로 수정할 수 있다. spring.devtools.restart.enabled의 경우 파일 수정시 자동실행 여부인데 이는 VS code에서 live server를 써본 사람이라면 쉽게 어떤 기능인지 알 수 있다. 단 Spring Boot DevTools 의존성 추가를 잊지말아야 한다. thymeleaf를 사용해 웹 페이지를 제공할 예정이므로 thymeleaf가 어떤 경로에 있는지 spring.thymeleaf.prefix를 통해 알려줘야한다. 또한 사용하는 thymeleaf가 어떤 확장자를 가진 파일을 사용하는지 spring.thymeleaf.suffix를 통해 알려준다. spring.thymeleaf.check-template-location은 있어도 되고 없어도 된다. 실행할 때 가야하는 곳에 해당 파일이 있는지 먼저 체크해주는 것이다. 중요한 것은 spring.thymeleaf.cache로 캐시파일의 사용 여부를 정하는 것 이다.
아래의 예제 코드는 Spring 공식홈페이지에 있는 내용으로 아래의 링크를 통하면 더 자세하게 알 수 있다.
Serving Web Content with Spring MVC
this guide is designed to get you productive as quickly as possible and using the latest Spring project releases and techniques as recommended by the Spring team
spring.io
5. GreetingController
import org.springframework.stereotype.Controller;
import org.springframework.ui.Model;
import org.springframework.web.bind.annotation.GetMapping;
import org.springframework.web.bind.annotation.RequestParam;

@Controller
public class GreetingController {

	@GetMapping("/greeting")
	public String greeting(@RequestParam(name = "name", required = false, defaultValue = "World") String name,
			Model model) {
		model.addAttribute("name", name);
		return "greeting";
	}

}
6. greeting.html
<!DOCTYPE HTML>
<html xmlns:th="http://www.thymeleaf.org">
<head>
    <title>Getting Started: Serving Web Content</title>
    <meta http-equiv="Content-Type" content="text/html; charset=UTF-8" />
</head>
<body>
    <p th:text="'Hello, ' + ${name} + '!'" />
</body>
</html>
① 서버를 실행시킨다.
② http://localhost:4040/greeting로 요청을한다.
③ Hello, World ! 가 출력된다.
예제코드를 실행했을 경우 위 순서대로 정상적으로 진행되야한다. 그러나 코드를 복사 붙혀넣기했음에도 불구하고 정상적으로 실행되지 않고 다음과 같은 오류가 계속 발생한다면 더보기를 참조할 것을 추천한다.

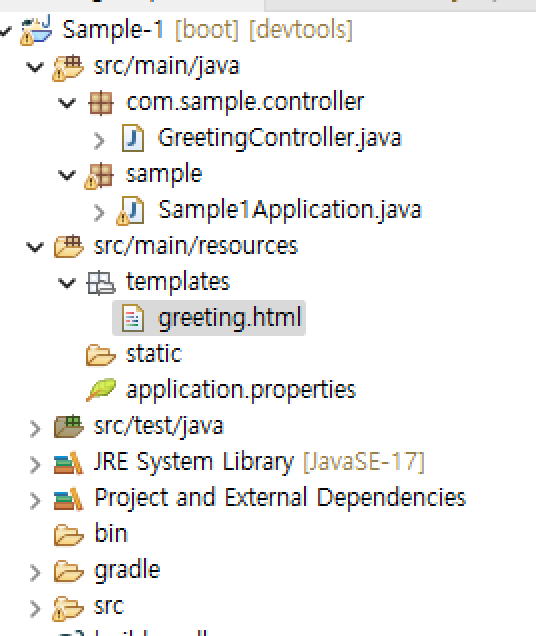
복사붙혀넣기를 했는데 위 사진이 계속 떴다면 혹시 아래 사진과 같은 구조를 가지고 있지는 않는가 확인해야할 필요가 있다. 이런 경우 우리는 추가 작업을 진행해야한다.
참고.
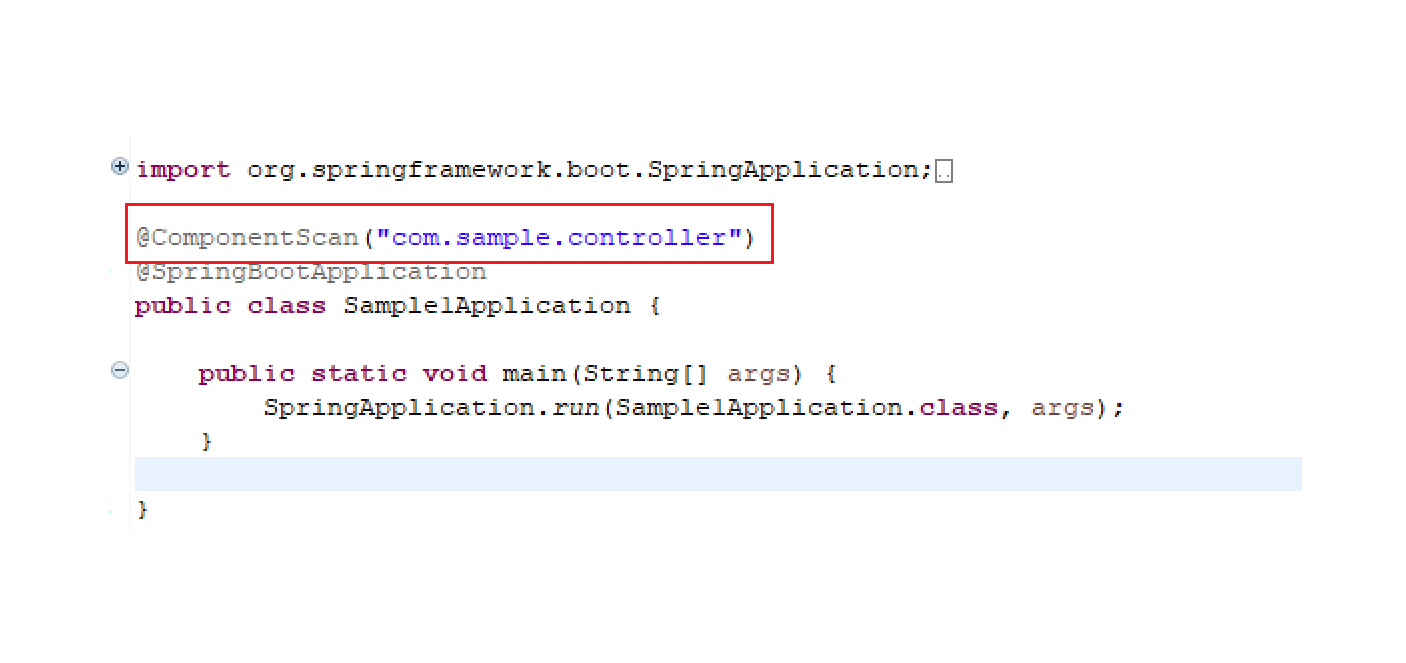
Controller에 @controller 어노테션을 추가했음에도 불구하고 정상적으로 HTML 파일을 읽지 못한다면 패키지 구조를 살펴봐야한다. 실행하고자 하는 Controller가 메인클래스(xxxApplication.java)가 위치한 패키지속 하위 구조가 아니라면 읽지 못한다. 이런경우 (xxxApplication.java)에 @componentScan("패키지경로")를 넣어주면 된다.
'Java > Springboot' 카테고리의 다른 글
| [SpringBoot] RESTful 구축 (0) | 2023.01.27 |
|---|---|
| [SpringBoot] jsp 사용하기 (0) | 2022.10.22 |
| [SpringBoot] error : Mapper.xml에서 부적합한 열 1111이 뜨는 경우 (0) | 2022.10.11 |
| [SpringBoot] Web Socket (0) | 2022.10.11 |